

Essential Hardwood Floor Care Tips for Daily and Weekly Maintenance
The most important hardwood floor care tips come down to a handful of simple, consistent habits: dust mop daily, damp mop weekly with a pH-neutral cleaner, wipe spills immediately, keep indoor humidity between 35% and 55%, and avoid steam mops and vinegar entirely. Follow those five rules and your floors will stay in great shape for decades.
Quick answer: What are the key hardwood floor care tips?
- Dust mop daily with a microfibre pad to remove grit before it scratches the finish
- Vacuum weekly using a hard floor setting with no beater bar
- Damp mop weekly with a pH-neutral hardwood floor cleaner, wrung almost dry
- Wipe spills immediately, blotting rather than scrubbing
- Keep indoor humidity between 35% and 55% year-round
- Use felt pads under all furniture legs
- Avoid steam mops, vinegar, and oil-based soaps entirely
- Recoat every 3 to 5 years to protect the finish before wear sets in
Most people think caring for hardwood floors is complicated or time-consuming. It really is not. The honest truth is that five minutes of daily dust mopping prevents around 80% of surface scratching, and that single habit does more for your floors than any expensive cleaning product ever could.
Hardwood floors are one of those rare home features that genuinely get better with age when treated well. Properly maintained, they can last anywhere from 50 to 100 years, and they return 70 to 80% of their installation cost in home resale value. Neglected floors, on the other hand, can deteriorate in as little as 10 to 20 years, turning what should be a lifetime investment into a costly replacement project.
I’m Lesley Upton, Inventory Control Manager at King of Floors in Surrey, BC. Since 2010, I’ve been helping homeowners from Vancouver and all across British Columbia who travel to our Surrey showroom for the best options and pricing. Over the past 16 years, I’ve fielded just about every question imaginable about hardwood floor care tips.
In this 2026 guide, I’ll share what actually works based on real-world experience with BC homeowners and the products we source from around the world.
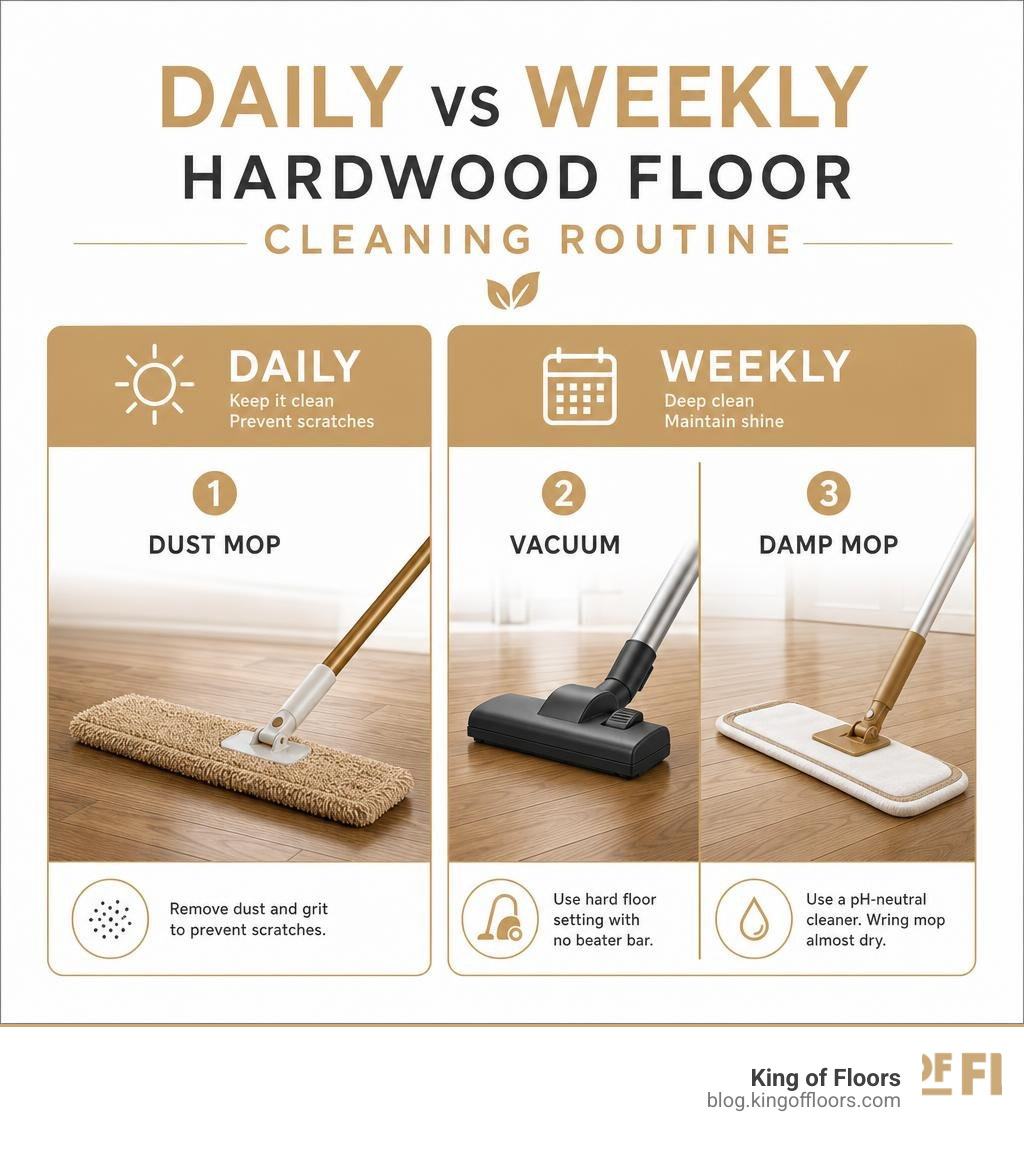
When it comes to keeping wood floors beautiful, consistency beats intensity every time. You do not need to spend hours scrubbing your floors on hands and knees. Instead, establishing a quick, regular routine is the secret to success. This routine stops abrasive grit from acting like sandpaper on your beautiful finish.
Essential daily hardwood floor care tips to prevent scratches
Daily maintenance is all about removing the invisible enemies of wood floors: dust, dirt, and outdoor grit. Every time someone walks across your floor with tiny dirt particles on their feet, they are essentially grinding sandpaper into the finish.
We highly recommend using a dry microfibre dust mop for your daily run-through. Microfibre pads use a natural static charge to attract and hold fine dust, pet hair, and microscopic grit, lifting them off the wood rather than pushing them around. Sweep in long, straight passes parallel to the wood grain. Pay special attention to high-traffic zones like entryways, hallways, and kitchen work areas. Taking just five minutes a day to dust mop can prevent up to 80 percent of surface scratches, saving you thousands of dollars in premature refinishing costs.
Weekly vacuuming and damp mopping guidelines
Once a week, it is time to upgrade your routine to a thorough vacuum and a light damp mop. Vacuuming gets into the deep crevices, bevels, and corners where dust mops cannot quite reach. However, you must use the correct settings. Always turn off the rotating brush roll (the beater bar) or use a dedicated hard floor attachment. A spinning beater bar with stiff bristles is designed to agitate carpets, but on wood, it can leave permanent swirl marks and scratches.
After vacuuming, follow up with a damp mop. The word “damp” is key here. Your mop pad should feel barely wet to the touch. When caring for your engineered hardwood flooring, excess water is your number one enemy. Spray your pH-neutral wood cleaner directly onto a microfibre mop pad rather than pouring water or spraying cleaner directly onto the floor. Work in small sections, mopping in the direction of the wood grain to prevent streaking and ensure an even, clean finish.
Finish-Specific Care: Polyurethane, Oil, and Wax Floors
Not all wood floors are created equal, and more importantly, they do not all have the same protective coating. Using the wrong cleaning product on a specific finish can cause cloudiness, strip away protection, or leave a sticky residue that attracts dirt like a magnet.
How to identify your floor finish with the water drop test
Before you apply any liquid or polish to your floor, you need to know what finish you are dealing with. Modern wood floors typically feature a polyurethane finish, which creates a hard, protective plastic-like barrier on top of the wood. Older or specialist floors might have a penetrating oil or a traditional solvent-based wax finish, which soak into the wood pores instead of sitting on top.
To find out what you have, perform a simple water drop test:
- Find an inconspicuous spot, like a corner or inside a closet.
- Place a few drops of water on the floor.
- If the water beads up and sits on top of the wood for 10 minutes or more, you have a modern surface finish like polyurethane.
- If the water absorbs into the wood and leaves a dark spot within a few minutes, you have a penetrating oil or wax finish.
Here is a quick comparison of how to care for each finish type:
| Finish Type | Protective Barrier | Safe Cleaning Products | Products to Avoid |
|---|---|---|---|
| Polyurethane | Hard surface film | pH-neutral spray cleaner, damp microfibre | Wax, oil soaps, steam mops, vinegar |
| Penetrating Oil | Hardened wood pores | Specialist oil soaps (e.g., WOCA), oil refreshers | All-purpose cleaners, heavy water, wax |
| Solvent-Based Wax | Thin wax layer | Dry dust mop, solvent-based waxes, buffing | Water-based cleaners, damp mopping, steam |
Safe cleaning products vs destructive household myths
There are plenty of DIY cleaning tips floating around the internet, but many of them are downright dangerous for wood floors.
The biggest myth is that vinegar and water make a safe, natural cleaner. Vinegar is highly acidic, with a pH of 2 to 3. While it might clean glass beautifully, that acid slowly eats away at polyurethane finishes over time. After a few months of weekly vinegar washes, your floors will lose their lustre, looking dull, cloudy, and worn.
Another major threat is the steam mop. Steam mops work by forcing hot moisture under high pressure into floor surfaces. This heat and moisture combination can easily penetrate the micro-cracks in your floor finish and the seams between planks. This leads to wood swelling, raised grain, cupping, and finish delamination. In fact, using a steam mop will immediately void almost every flooring manufacturer warranty in the industry. Stick to pH-neutral, professional wood cleaners to keep your floors safe and shiny.
Managing Climate and Humidity in the Lower Mainland
For homeowners in Surrey and those travelling from the wider Metro Vancouver area to our showroom, dealing with our unique coastal climate is a key part of floor care. We experience dry, cold winters and warm, humid summers. Because wood is a natural, hygroscopic material, it constantly absorbs and releases moisture, expanding and contracting as the seasons change. Managing this movement is critical to preventing permanent damage.
Why maintaining 35% to 55% humidity prevents warping and gaps
To keep your floors stable, you must control your indoor environment. The ideal indoor relative humidity for wood floors is between 35% and 55% year-round.
When relative humidity drops below 35%, usually during dry winter months when home heating is running, the wood loses moisture and shrinks. This causes small, nickel-width gaps to appear between your floor planks. While these gaps often close naturally when spring returns, prolonged dryness can cause the wood to split or crack.
Conversely, when humidity climbs above 55%, especially during muggy summer days, the wood absorbs moisture and swells. This causes the edges of the planks to rise higher than the centres, a damaging process known as cupping. Maintaining a stable humidity range ensures the dimensional stability of your wood, protecting both solid and engineered hardwood flooring from warping.
Seasonal hardwood floor care tips for BC homeowners
We recommend investing in a simple, inexpensive digital hygrometer to monitor your home’s humidity levels.
During the damp BC winters, running a whole-home or portable humidifier helps keep indoor moisture levels above the 35% threshold, preventing those unsightly gaps. In the summer, using your air conditioning or a dehumidifier will keep indoor humidity below the 55% limit.
Additionally, winter brings another local hazard: road salt and ice-melt chemicals tracked in on boots. These crystalline salts are highly abrasive and chemically aggressive, meaning they can easily scratch and pit your floor finish. Place high-quality, heavy-duty entryway mats both inside and outside your doors, and establish a strict no-shoes policy in your home to keep winter grit at bay.
Preventing and Repairing Scratches, Dents, and Stains
No wood floor is completely immune to wear and tear. When we talk about “scratch-resistant” flooring, we mean a floor that is designed to resist normal, everyday wear, not a floor that is completely damage-proof. Understanding this distinction helps you set realistic expectations and take the right preventative steps.
Practical ways to protect floors from pets, shoes, and furniture
Preventing damage is always easier and cheaper than repairing it. Here are the most effective ways to protect your floors daily:
- Pet nail trimming: Keep your dogs’ and cats’ nails trimmed short. If you can hear their nails clicking on the floor when they walk, it is time for a trim.
- Felt glides: Apply heavy-duty, stick-on or nail-in felt pads to the legs of all chairs, tables, and heavy furniture. Replace these pads annually as they wear down and collect grit.
- No high heels or cleats: Avoid walking on wood floors in high heels, work boots, or athletic cleats. A stiletto heel concentrates thousands of pounds of pressure per square inch, easily denting even the hardest oak or maple.
- Area rugs: Use breathable, non-rubber-backed rugs in high-spill zones like in front of the kitchen sink and stove, as well as high-traffic entryways.
If your home has high-traffic zones that are simply too busy for engineered wood, you might want to consider highly durable laminate flooring as a practical, scratch-resistant alternative that looks beautiful while handling heavy daily use.
How to repair light, medium, and deep scratches
When scratches do happen, you can often fix them yourself without needing a professional:
- Light scratches: These are surface-level marks that only affect the clear coat finish, not the wood itself. You can easily hide these by applying a small amount of specialist floor polish or using a touch-up marker that matches your floor’s colour.
- Medium scratches: These penetrate through the finish and into the wood surface. Use a matching wood filler wax crayon to fill the scratch. Rub the crayon over the scratch, scrape away the excess with a plastic card, and buff the area with a soft cloth.
- Deep scratches and gouges: If a scratch goes deep into the wood plank, you may need to sand the local area lightly, apply colour-matching wood putty, and seal it with a dab of polyurethane finish. For severe damage, a professional board replacement is often the best path forward.
When to Recoat, Screen, or Fully Refinish Your Wood Floors
Over the years, even the best-maintained floors will show signs of overall wear. When the surface starts to look dull and tired, you have a few options to bring back its original beauty. Knowing which process you need can save you thousands of dollars.
Screen-and-recoat vs. a full sand-and-refinish
A screen-and-recoat is a quick, cost-effective way to refresh a tired floor. In this process, a professional lightly abrades (or “screens”) the top layer of the existing polyurethane finish to remove minor scuffs and scratches. They then apply a fresh, protective topcoat of polyurethane. It takes just one day, creates very little dust, and costs a fraction of a full refinish, usually around $500 to $1,500 CAD for a standard room.
A full sand-and-refinish is a much more intensive process. The floor is sanded completely down to the bare, raw wood, removing all existing finish, deep scratches, dents, and stains. The wood is then stained and sealed with multiple new coats of protective finish. This process takes three to five days, generates dust, and costs significantly more, typically $1,500 to $4,000 CAD or more depending on the area.
If you are looking for long-term durability and beautiful design options, exploring our engineered best sellers will show you products designed to handle these maintenance cycles beautifully.
Lifespan and wear layer expectations for engineered hardwood floors
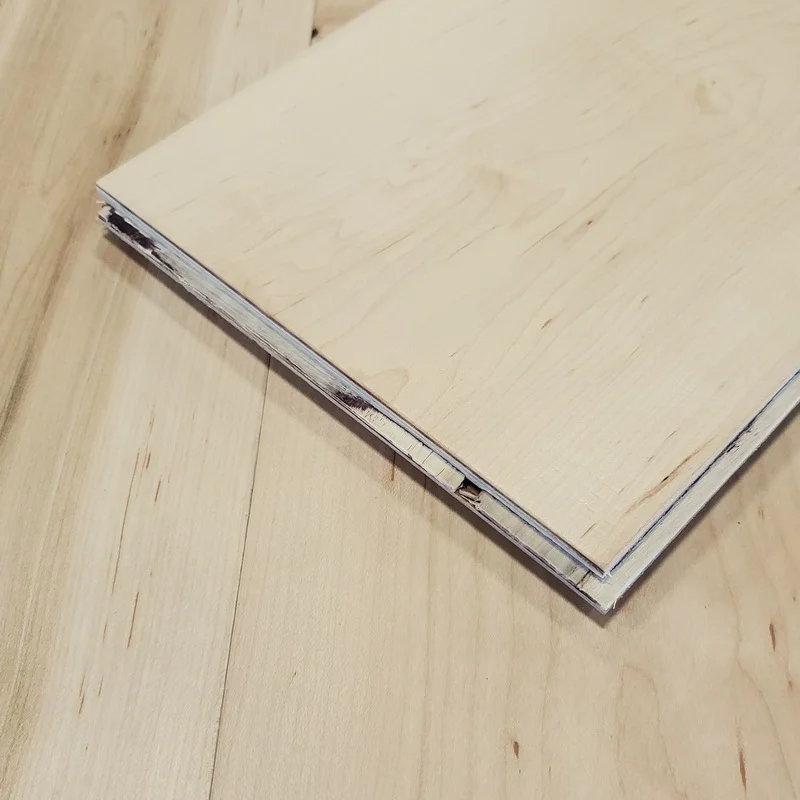
Unlike solid hardwood, which is a single piece of wood from top to bottom, engineered hardwood consists of a real hardwood veneer bonded over a highly stable, multi-layered core. The thickness of this top veneer, known as the wear layer, determines how many times the floor can be sanded and refinished over its lifetime.
- 1mm to 2mm wear layer: Standard engineered floors cannot be fully sanded and refinished. However, they can still be screened and recoated multiple times to refresh the finish.
- 3mm to 4mm wear layer: Premium engineered floors can be fully sanded and refinished 1 to 2 times, giving them a lifespan of 40 to 60 years.
- 5mm to 6mm wear layer: Ultra-thick engineered floors can be refinished 3 to 4 times, performing almost identically to solid hardwood while offering superior dimensional stability.
Frequently Asked Questions About Hardwood Floor Care
To help you get quick answers for modern search tools, here are clear, direct answers to the most common questions we hear at our Surrey showroom.
Can you use a steam mop on engineered hardwood floors?
No, you must never use a steam mop on engineered hardwood floors. The intense heat and pressurised moisture easily penetrate the seams between planks, causing the timber layers to swell, buckle, and separate. Additionally, using a steam mop will immediately void your manufacturer warranty.
Is vinegar safe for cleaning polyurethane wood finishes?
No, vinegar is highly acidic and unsafe for polyurethane finishes. Over time, the acid chemically breaks down the protective coating, leaving your floors looking dull, hazy, and vulnerable to moisture damage. To protect your investment, always use a pH-neutral wood cleaner instead.
How often should engineered hardwood floors be refinished?
Most busy homes only require a full sand and refinish every seven to ten years. However, you can easily extend this timeline to fifteen or twenty years by performing a simple, cost-effective screen and recoat every three to five years before the finish wears through.
Protecting Your Flooring Investment in Surrey, BC
Caring for your hardwood floors does not require endless hours of hard work. By establishing simple daily habits like dust mopping, keeping an eye on your home’s humidity, and using the right pH-neutral cleaning products, you can protect your investment and enjoy beautiful floors for a lifetime.
At King of Floors, we are based in Surrey, BC, and have been serving homeowners from Langley, Metro Vancouver, and all across the province who travel to our showroom for better options and pricing since 2010. We pride ourselves on being a friendly, honest flooring advisor rather than a high-pressure sales team. Whether you are looking for premium engineered hardwood or highly durable European laminate, we are here to help you find the perfect match for your home and lifestyle.
Ready to find your next floor or get expert advice on caring for your current one?
- Visit our destination showroom in Surrey, BC, to see our massive selection of in-stock flooring options.
- Contact our flooring experts today for honest, no-pressure advice on your next home project.