What You Need to Know Before Starting Your Waterproof Laminate Installation
A waterproof laminate installation guide is exactly what you need if you want a beautiful, durable floor without the stress of costly mistakes. Here is a quick overview of the core steps:
- Acclimate your planks in the room for at least 48 hours before you start.
- Test your subfloor for moisture and levelness (concrete must read under 5 lbs/1,000 sq ft/24 hrs; wood must be under 12% moisture content).
- Prepare your subfloor by levelling, cleaning, and laying a vapour barrier where needed.
- Plan your layout so your first and last rows are balanced, and mix planks from multiple boxes.
- Install the first row with the tongue removed, maintaining a 3/8-inch (10 mm) expansion gap along all walls.
- Lock subsequent rows using the tongue-and-groove click system at a 20-30 degree angle.
- Stagger your end joints by at least 12 inches between rows.
- Seal the perimeter with PE foam backer rod and 100% silicone sealant, especially in wet areas like bathrooms.
- Install transitions and skirting boards, attaching them to the wall, never the floor.
- Maintain the floor with damp mopping and prompt spill clean-up to protect your warranty.
Waterproof laminate is one of the most rewarding flooring upgrades a budget-conscious homeowner can tackle. Unlike regular laminate, which can swell and warp when water sneaks into the seams, quality waterproof laminate uses a tightly engineered locking system and protective core to resist moisture, with some products even offering a 72-hour standing water warranty when installed correctly. It looks stunning, it is forgiving underfoot, and with the right preparation it is genuinely achievable as a DIY project.
That said, “waterproof” does not mean “install it any way you like and hope for the best.” The details really do matter here. Get the subfloor wrong, skip the silicone sealant, or forget the expansion gap, and you could end up with a floor that buckles, gaps, or voids your warranty entirely. This guide walks you through every step, from jobsite conditions and subfloor prep all the way through to finishing touches and long-term care.
I’m Lesley Upton, Inventory Control Manager at King of Floors, and after more than a decade sourcing flooring from factories around the world and helping customers find the right fit for their homes, I have seen just about every waterproof laminate installation guide scenario there is. I will share what actually works so you can install with confidence and get a result you will love every day.
Mastering the Waterproof Laminate Installation Guide: Preparation and Subfloors
Before we even think about clicking planks together, we need to talk about the environment. Laminate is a “living” product in the sense that its wood-based core reacts to the world around it.
At King of Floors, we’ve seen many DIYers rush into the fun part, only to face issues later because the room wasn’t ready.
Whether you are dealing with a busy kitchen or a master bathroom, the preparation phase is where your warranty is either protected or voided. We recommend reading our article on the pros and cons of waterproof laminate flooring to understand exactly how these materials behave.
Ideal Jobsite Conditions and Tools for Your Waterproof Laminate Installation Guide
To get a professional result, your home needs to be in “living mode.” This means all “wet” construction work like drywall mudding, painting, and plumbing must be 100% finished.
Climate Control is King:
- Temperature: Keep the room between 18°C and 29°C.
- Humidity: Maintain a relative humidity (RH) between 35% and 65%.
- Indoor Use Only: Laminate is strictly for climate-controlled indoor spaces. No sunrooms or unheated porches!
Bathrooms are humid by nature, so if you’re installing there, ensure your exhaust fan is functional to keep that RH in check long-term.
Your Essential Tool Kit:
- Safety Gear: Safety glasses, gloves, and a dust mask (cutting laminate creates fine dust you don’t want to inhale).
- Cutting Tools: A circular saw or jigsaw with a fine-tooth blade.
- Installation Kit: You’ll need a tapping block, a pull bar, and plenty of 3/8-inch (10 mm) spacers.
- Measuring Tools: Tape measure, pencil, and a square edge.
Subfloor Levelling, Acclimation, and Basement Considerations
The subfloor is the foundation of your success. If it isn’t flat, your floor will feel “bouncy” or, worse, the locking systems will snap under pressure.
The Golden Rule of Flatness: Your subfloor must be flat within 3/16-inch (4.8 mm) over a 10-foot span. If you find low spots, use a latex-fortified Portland cement levelling compound to smooth them out.
Moisture Testing:
- Concrete: Must be cured for at least 60–90 days. Use a calcium chloride test; it must read ≤ 5 lbs/1,000 sq ft/24 hours.
- Wood: Moisture content should be ≤ 12%.
- Vapour Barrier: For all concrete subfloors, a 6-mil polyethylene vapour barrier is mandatory to stop moisture from rising into your planks.
The 48-Hour Wait: Acclimation is not a suggestion; it is a requirement. Lay your unopened boxes flat in the installation room for at least 48 hours (some manufacturers suggest up to 96 hours if the temperature difference from the warehouse is extreme). This prevents the planks from expanding or shrinking dramatically after you’ve already laid them. For more on choosing the right product for tough areas, check our best waterproof laminate flooring guide.
The Step-by-Step Process: Laying Planks and Sealing Wet Areas
Now for the rewarding part! Waterproof laminate uses a “floating floor” method. This means it isn’t glued or nailed to the subfloor. Instead, the planks lock together and “float” as one large unit. This allows the floor to expand and contract naturally with Surrey’s seasonal humidity changes.
Installing the First Rows and Tongue-and-Groove Techniques
Planning your layout is vital. You don’t want to end up with a tiny sliver of a plank at the far wall. Measure the room width and divide by the plank width to ensure your last row will be at least 2 inches (50 mm) wide.
Starting the First Row:
- Start in a corner, usually the longest wall or the one with the main light source.
- Remove the tongue: Use a utility knife or saw to remove the tongue from the side of the planks facing the wall. This ensures a clean edge for your expansion gap.
- Use Spacers: Place 3/8-inch spacers between the planks and the wall.
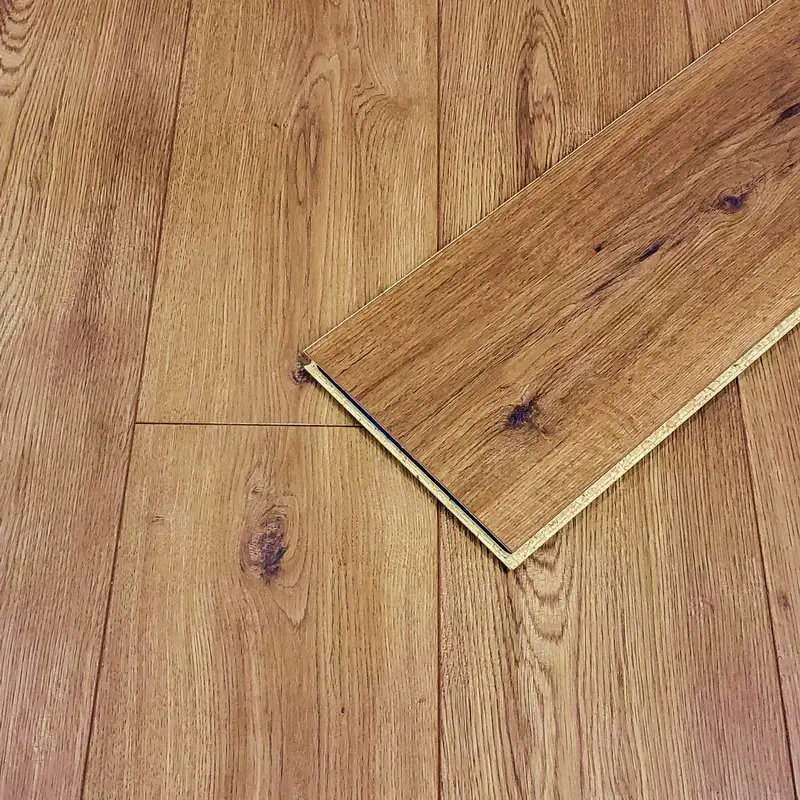
The Click-Lock Technique: Most modern waterproof laminates use a click-lock system. Hold the new plank at a 20-30 degree angle, fit the tongue into the groove of the previous row, and rotate it downward. It should click into place. Use your tapping block and a rubber mallet to gently ensure the joints are tight, but never force them—if it isn’t clicking, check for debris in the groove.
Staggering for Strength: Never line up the end joints of your planks. You should stagger them by at least 12 inches (30 cm) to create a strong, stable floor. Ensure your starting piece in each row is at least 8 inches long.
Navigating Doorways, Transitions, and Expansion Gaps
The most common laminate flooring mistakes happen at the edges. Because the floor floats, it needs room to breathe.
- Expansion Gaps: You must maintain a 10 mm (3/8-inch) gap around every vertical obstacle—walls, pipes, and cabinets.
- Door Jambs: Don’t try to cut the plank to fit around a complicated door frame. Instead, use a handsaw to “undercut” the wooden door jamb so the flooring can slide underneath it.
- Large Spaces: If your room is longer or wider than 40 feet (12 metres), you must install a T-moulding transition strip to allow for extra movement.
- Fixed Objects: Never install heavy kitchen islands or fixed cabinetry on top of a floating floor. Install the cabinets first, then floor around them.
Achieving a Watertight Seal for Your Waterproof Laminate Installation Guide
While the planks themselves are water-resistant, the expansion gaps are the “Achilles’ heel” where water can seep under the floor. To maintain a true waterproof warranty in bathrooms or kitchens, you must use waterproof silicone caulk.
The Sealing Process:
- Remove your spacers once the flooring is laid.
- Insert a PE foam backer rod into the expansion gap. This provides a firm base for the sealant.
- Apply a bead of 100% silicone sealant (never acrylic!) over the backer rod around the entire perimeter of the room.
- Seal around pipes and toilet flanges with the same silicone to ensure no water can get underneath.
Finishing Touches, Maintenance, and Warranty Protection
Once your silicone is dry, you can install your skirting boards (baseboards) and transition profiles.
Crucial Tip: Always nail your skirting boards to the wall, never through the flooring. If you pin the floor to the subfloor with nails, it can’t move, which leads to buckling and “peaking” at the seams.
Maintenance for Longevity:
- Cleaning: Use a damp mop—never a steam cleaner. Steam can force moisture into the core and ruin the floor.
- Protection: Place felt pads under all furniture legs and use mats at entrances to catch grit that can scratch the wear layer.
- Spills: Even with a 72-hour warranty, it is best practice to wipe up spills immediately.
By following this waterproof laminate installation guide, you are setting yourself up for a floor that looks as good in ten years as it does today. If you’re in the Surrey, BC area, come visit our 85,000 sq ft warehouse to see the largest selection of European laminate in stock. We are a family-owned Canadian business, and we’re here to help you get the job done right.
Ready to find your perfect floor? Browse our premium laminate selection or call us to learn about current discounts!